Valentines day only 3 days away! What better a way to represent this time of love than with some beautiful DIY gifts and decorations for your home.

 2. Find some playing cards and tell your love 52 reasons why you adore them!
 Supplies:
- Deck of Cards
- Binder Rings or Lace, String, Ribbon etc
- Hole Punch
- Marker
Type/write out 52 Reasons I Love You, the date, or anything else you want to put on the front or back of the card deck. Hole punch each card and connect them together.

3. L.O.V.E. fire place mantel or table decoration.
Supplies:
- Paper Mache Letters – I got mine at Joann’s they are the 8” height
- Gold Spray Paint
- Dowell Rod
- Feathers
- Hearts
- Hot Glue Gun
- Gold Leather Cord
Spray Paint the letters gold. Cut a “trap door” in the back of each letter and remove the inner support cardboard (otherwise your dowel rod won’t poke through).
Measure up 4” from the bottom of each letter and place a mark. Using an exacto knife, cut a hole the size of your dowel rod in the edge of each letter.
Feed your dowel rod through all the letters. Trim your dowel rod to a good length, it’s up to you, I took off about 6”. Using hot glue, glue a foam heart to one end of the rod. Glue feathers to the other end of the rod. Cover the end of the feathers with gold leather cord. Glue in place.
That’s it! You’re done, easy peasy huh?

4. Make a wall of paper hearts! You could stick them on a wall or door temporarily, or glue them to a board permanently to make a 3D wall poster. You can attach to presents too!
Supplies:
- Construction paper
- Scissors
- Glue
This is made from traditional heart shapes with a slit cut partway down the center. To make a flat heart into something three dimensional, roll the inner edges of the two arcs toward the back with your fingers to get the shape started.


When the edges are glued together, the heart looks 3D. Once you get the hang of it, you can bend that paper to your will and make dozens.

5. Nothing says endless love like carving your initials into a candle!
Supplies:
- Candle
- Linoleum Cutter
- Gold Leaf Pen/Ball Point Pen
- Tape
- Design
Start by taping your design to a candle. You don’t want it to slip when you draw over it! You can freehand the design or make it in Photoshop if you need more of a guide. I used the unique shape tool in Photoshop to make the heart and Garamond for the font.
Firmly trace over your design with a ball point pen. This will make the initial path you need for carving, so be extra careful.
Go over your initial tracing with the linoleum cutter. The line should be wide and deep enough to fit the tip of your gold leaf pen.
Go over the inside of your carving with a gold leaf pen. You may need a second coat to achieve the level of gold you want. Let dry and gift to your sweetheart.


6. These leather conversation hearts are easy to make and very economical! You can turn these hearts into Necklaces, Key Chains and Key Fobs. It think that they’d be adorable attached to a purse handle.
Supplies:
- Pre Cut Leather Hearts- you can find these at leather stores and online
- A leather alphabet stamping kit
- I also had a Native American leather stamping kit (for the arrows)
- A punch that can go through leather (like the crop a dile) or an awl hole punch set
- Eyelets, Jump Rings
- Chain and Key Chain or Necklace Chain
- Leather Conditioner to seal the leather when you’re done
- Washi Tape
To start, I found it easiest to mark a straight line on my hearts with washi tape. It’s not tacky so it won’t mess up the leather, and it gave me a guide to stamp my letters straight.Start with the bottom row of letters first (if you’re doing two rows).
Begin stamping your letters working from the center out. To do this attach the die to the stamping tool, and on a hard surface (like a butcher block, piece of heavy granite, or concrete) hit the tool with the hammer 4-5 times. (You need to test your stamps first to see how many hits it takes for a good impression, just use one of your hearts as a ‘test’).
When you’re done stamping remove the washi tape. Using a paper towel apply some leather conditioner to the leather to seal it. If you’re making a key fob or key ring, punch a hole in the side of the heart and set an eyelet into it (just follow the instructions on the eyelet package). Use jump rings to attach key fobs or key rings as you like.
To make the necklaces, punch two holes in the top of the heart (1/16”) then feed a jump ring through each. Loop 30” of chain onto the jump rings and close the jump rings.


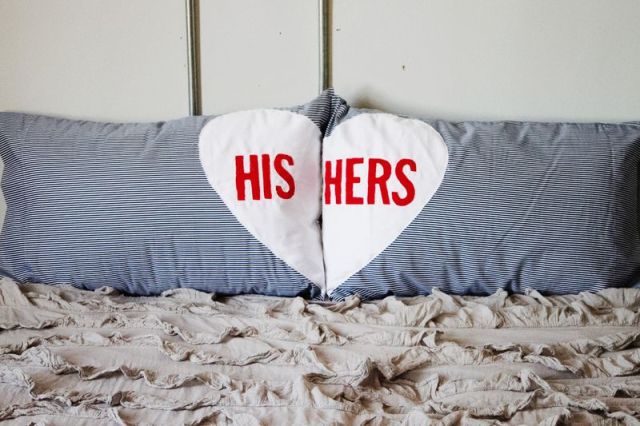
7. Create matching His and Her pillow cases — awww so adorable!
Supplies:
- Pillow cases
- Red and white cotton fabric
- Adhesive letters
- You will also need to have scissors, sewing pins and a sewing machine!
First, cut a large heart out of the white fabric. Make sure it’s not bigger than your pillow case! We made our heart wider than normal because when the pillow is in the case it tends to make it bulge, making it look less wide.
Next, apply the adhesive letters. You can buy a pack of letters at your local craft store, or make your own out of contact paper!
Once you’ve applied the lettering, flip the heart over, facing down. Begin pinning large squares of the red fabric on the back. This will be the background of the lettering so be sure that all of the adhesive letters have fabric behind it.
Next, slowly stitch around all of the adhesive lettering, sewing together the red and white fabric. 6. Once you’ve sewn around all the lettering, remove the contact paper!
Next, you’ll slowly cut out each letter. Make sure you only cut through the top layer of fabric!
Lastly, cut the heart down the middle and sew it to the pillow case! We used a simple top stitch close to the edge of the fabric to prevent as much fray as possible.

8. What better way to your man’s heart (or to anyone’s heart for that matter) than with something yummy and sweet! Grab your favorite recipe and here are a few ideas on how you can decorate for this heart filled holiday.


Hope these DIY decorations and gifts got your creative juices flowing! You will surely
make someone feel special by giving a home made gift. Happy Valentines day to you all!
Originally seen here :)
Sources:
www.pinterest.com
www.polkadotchair.com
www.stylemepretty.com
www.studiodiy.com
www.apartmenttherapy.com
www.abeautifulmess.com
